Delving the depths of computing,
hoping not to get eaten by a wumpus
2024-10-01
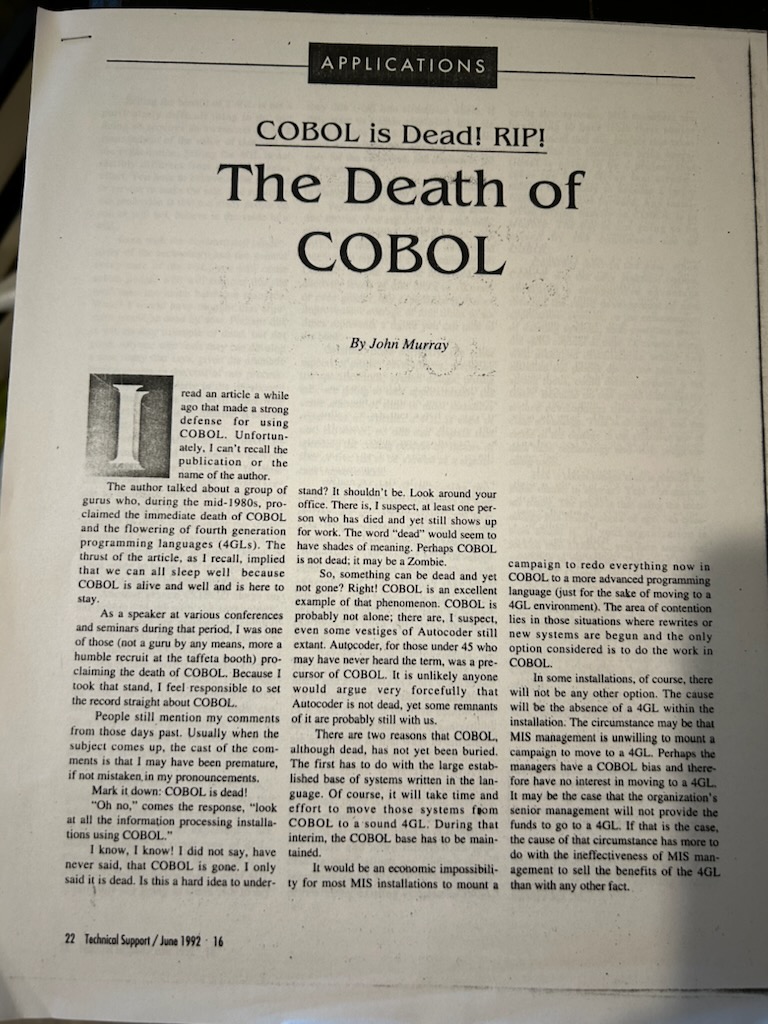
In June of 1992, my grandfather had an article published in Technical Support
magazine proclaiming the death of Cobol. It naturally contains some of the
buzzwords of the time, such as fourth-generation programming language (4GL). If
you're not familiar with that term, suffice it to say that the Wikipedia
page
lists several examples, and Cobol has outlasted most of them.
There's a text version of the article available in archives of the
NaSPA: http://www.naspa.net/magazine/1992/t9206003.txt
The word dead would seem to have shades of meaning. Perhaps Cobol is not dead; it may be a Zombie. So, something can be dead and yet not gone? Right! Cobol is an excellent example of that phenomenon. COBOL is probably not alone; there are, I suspect, even some vestiges of Autocoder still extant. Autocoder, for those under 45 who may have never heard the term, was a precursor of COBOL. It is unlikely anyone would argue very forcefully that Autocoder is not dead, yet some
remnants of it are probably still with us.
As you might notice, he had a dry wit. There was one time I was able to
reflect one of his retorts right back at him, and my grandma was so proud; the
student had become the master.
There was one thing that kept the Cobol zombie shambling along, and that's the
Y2K problem. Make no mistake: as much as it was hyped in the news at the time,
and as much of a nothingburger it seemed to be, Y2K was a gigantic problem.
It necessitated training up a new generation of Cobol programmers. That may
have kept Cobol going for a while longer.
These days, I avoid the term "dead" for programming languages at all. If
they ever had a large installed base, then they never die. They have long
tails where they trail off into obscurity with no junior programmers learning it.
My grandpa died on Sept 1, 2024 at 91 years of age. Officially, he died of
pneumonia. My grandma had died the previous April, and he had asked not to
receive any treatment.
2024-05-12
If we were to build a Solarpunk Internet, what would that look like? What kind of bandwidth can we expect, and what can we do with that? If we need to degrowth the Internet in order to build it back better, what kind of bandwidth do we need?
I’ve been slowly transforming this blog into one that is far simpler than it was before. No JavaScript, no cookies, and all static HTML. The current homepage size is under 200KiB, though that may fluctuate as pictures come on and off the various posts. This means the site would load on a 56Kbps modem in around 30 seconds. A 1Mbps connection would do it in less than 2 seconds.
Humans read at around 200-300 WPM, and the average English word is 4.7 characters. In ASCII, that means you read at a max of 11,280 baud. If we were using pure plaintext, 14.4Kbps is faster than you could read. Markdown doesn’t add much, so we could do some simple formatting and still have text scrolling by faster than you can read.
If you have HTML with some non-trivial CSS and a few graphics, a 1Mbps connection will do fine. The current web isn’t designed like that, of course, but a Solarpunk web could be. Start removing oversized JS packages, auto-play video ads, and pixel trackers, and suddenly the web looks just fine on tiny connections.
Real-time text messaging isn’t going to stress a 1Mbps connection. If we put pictures over the same protocol, then it depends on how it’s done. The camera on my Pixel 6 takes pictures around 2.5MiB for a compressed JPG at full resolution. On a 1Mbps connection, that would take about 20 seconds, which is OK but not great. We’d want to either jump to 10Mbps, or resize the resolution down, or find a better compressor than JPG (which does exist), or some combination of those.
Real-time gaming is a tricky one. We did plenty of it back in the 1990s on 56Kbps modems. As long as the phone company connections were good and you had a decent ISP, it worked OK. Games tend to be more sensitive to latency than bandwidth. Even today, their bandwidth requirements are modest:
https://www.whistleout.com.au/Broadband/Guides/how-much-data-do-I-need-for-online-gaming
The highest game on this list is Destiny 2 at 300MiB/hour. Averaged out, that’s less than 100Kbps. However, there’s probably some burstiness to that; the initial server connection will take more, and so will voice chat. Even so, 1Mbps will probably do fine for gaming provided latency is acceptable. Going to 10Mbps gives it a good buffer over the minimum.
If you thought you needed Comcast to give you a 1Gbps connection to game well, sorry, not how it works. Comcast might be giving you terrible quality of service, and they might crank that dial when you give them more money, but the bandwidth they’re promising right now is probably more than enough to play Helldivers 2.
Downloading games is a separate problem. Modern games are notorious for having heavy download sizes. Doesn’t necessarily have to be that way, though. A download of the entire SNES rom library, uncompressed, is about 11GiB. A 1Mbps connection would get through that in about a day, and then you have it forever. 10Mbps means it’s less than 3 hours.
Factorio (a 2D game) takes 345MiB to download. Satisfactory (a 3D game) is around 20GiB. Indie titles are OK for downloading on 10Mbps connections if you’re patient. 100Mbps is enough if you’re not.
Podcasts can get by on a 64kbps encoding rate because most podcasts are just spoken word, not music. If you want higher quality, they can go up to 128kbps. Either way, it’s not going to stress a 1Mbps connection.
Video is where the real bandwidth hogs come in. Take a look at the table here:
https://support.video.ibm.com/hc/en-us/articles/207852117-Internet-connection-and-recommended-encoding-settings
A 480p video comes in at less than 0.5Mbps, but nobody wants to watch that. 720p is fine for most smartphones, and you can do that at 10Mbps with no problem. 1080p still doesn’t break the 10Mbps mark, and even 4K at high encoding levels doesn’t break 100Mbps.
However, that’s what’s typical on the modern Internet. The original Blu-Ray disc standard had a maximum read speed of 36Mbps to support 1080p. Ultra HD Blu-Ray for 4k went up to 144Mbps. Streaming services don’t get close to that bitrate, and people seem to find their level of compression to be acceptable.
With variable bit rate encoding, discs may not even encode movies at max rate for the entire thing. Still, this is the one thing we have so far that breaks a 100Mbps connection limit.
If you don’t need to support real-time streaming of 4K videos at Ultra HD Blu-Ray compression levels, then 100Mbps is plenty, and even 10Mbps could be enough.
VR is where bandwidth potentially explodes. The resolution and framerate goes way up with a comparable increase in size. We can imagine some kind of future headset that streams live events with an almost holodeck level of immersion that will need a 1Gbps connection. Does your Solarpunk community want that?
Looking over all this, 1Mbps seems sufficient, and 10Mbps is nice to have. Much of the stuff that pushes it higher just seems unnecessary in a Solarpunk context. This has a lot of implications for building a Solarpunk Internet. Equipment doesn’t need to be sized for 1Gbps connections, and that means routers can be modest and use little power. Out-of-date stuff being thrown away by enterprise customers will handle this fine.
This only applies to the download side, though. Serving the content means having several streams of 1Mbps video (for example). Self-hosting that over a 10Mbps connection would mean only a few people can watch it at once in real-time. Some kind of way to share bandwidth amongst several hosts, such as with BitTorrent, would be very helpful.
2024-03-30
Big new battery breakthroughs often come with headlines proclaiming ten or
even five minute charging times for EVs that can go 600 miles on a full
charge. Batteries are not the full story. These charge times would require a
whole new plug design, and likely entirely new transformers to power the charge
banks. There are bottlenecks besides batteries.
Let's take the Tesla Model Y's standard size battery of 60 kWh. Let's say it's
at 10% charge (6 kWh) and we want to go all the way to 100%. That means we need
to feed it 54 kWh (assuming no efficiency loss), which can just mean giving it
54 kW over the course of 60 minutes. To do the same in 5 minutes, we have to
feed it 650 kW.
Note that this isn't even the biggest battery out there right now. It's a
modest sized car with a good enough battery.
An SAE J3400 plug (the standard being developed from Tesla's plug) supports
up to 1,000VDC and 650A of current. This means it has a max capacity of
650 kW; any efficiency loss at all will exceed the limit above. CCS
plugs only support 350 kW. Japanese CHAdeMO plugs can go up to 900 kW, but
they are rare outside of Japan.
Meanwhile, the transformers being built out for current EV infrastructure
won't even hit that much. Tesla V4 Superchargers are also only designed
up to 250 kW. So the plug can't support it, and that isn't even the biggest
bottleneck.
Even if the chargers and plug were redesigned, you're not likely to see
many of them for several years.
You can play with the numbers--a larger or smaller battery, or only going to
80% instead of 100%, and calculating in some efficiency loss--but the results
are always between "barely possible" and "not going to work".
We could design a whole new plug that supports higher charge rates and deploy
even beefier transformers, but why? Aiming for 20 minute charge times for
250 mile range is generally more than enough even when cold weather chops
20% or even 40% off this range. That gets you 2-4 hours of driving, which
is about when you should be getting out to stretch, anyway.
How much are these 600 mile range EVs going to weigh? Why not keep them at
around 250 miles and use new battery tech to reduce their weight?
Instead of looking for absurd ranges and charge times, focus on what
people are going to do with those 20 minutes. Many of the L3 chargers you'd
use on road trips right now are in parking lots for Walmart, dealerships, or
places that are equally uninteresting and unappealing. How about a nice place
to sit down, get on wifi, and grab a cup of coffee? Or just walk around in
something other than a parking lot?
This whole problem can go away by providing a nice experience while people
are waiting.
EV charge times look a lot better if they're combined with walkable cities.
2024-03-20
Here's some strawman reasons that Moore's Law is dead:
- Photoshop doesn't edit twice as fast every 18 months
- GTA V framerate doesn't double every 18 months
- Frequency doesn't double every 18 months
- Hard drive capacity doesn't double every 18 months
- My networth doesn't double every 18 months
None of these are correct for the simple reason that Moore never made these
claims. However, Moore's Law is dead for completely different reasons that
nobody mentions because they haven't read the original paper. So let's
all do that, and keep in mind that Moore was writing before any human landed on
the Moon.
https://hasler.ece.gatech.edu/Published_papers/Technology_overview/gordon_moore_1965_article.pdf
Here's the key quote:
The complexity for minimum component costs has increased at a rate of roughly a factor of two per year
The version of the paper above has additional material from 40 years on, and
clarifies the above:
So the original one was doubling every year in complexity now in 1975, I had to go back and revisit this... and I noticed we were losing one of the key factors that let us make this remarkable rate of progress... and it was one that was contributing about half of the advances were making.
So then I changed it to looking forward, we’d only be doubling every couple of years, and that was really the two predictions I made. Now the one that gets quoted is doubling every 18 months… I think it was Dave House, who used to work here at Intel, did that, he decided that the complexity was doubling every two years and the transistors were getting faster, that computer performance was going to double every 18 months... but that’s what got on Intel’s Website... and everything else. I never said 18 months that’s the way it often gets quoted.
Not only that, but Moore states that he was working with only a few datapoints
at the time, and expected things to continue for a few more years. He never
would have guessed back then that we'd be pushing it for decades.
So I looked at what we were doing in integrated circuits at that time, and we made a few circuits and gotten up to 30 circuits on the most complex chips that were out there in the laboratory, we were working on with about 60, and I looked and said gee in fact from the days of the original planar transistor, which was 1959, we had about doubled every year the amount of components we could put on a chip. So I took that first few points, up to 60 components on a chip in 1965 and blindly extrapolated for about 10 years and said okay, in 1975 we’ll have about 60 thousand components on a chip
The idea of 60,000 components on a chip probably sounded like huge progress at
the time. That would drive a revolution, and it did. But keep going for another
few decades? There was no expectation that it would, and he'd have been insane
to suggest it. He was extrapolating from about 6 years of data, and it needed to
be revised 10 years later.
Look carefully at that original claim: "The complexity for minimum
component costs has increased at a rate of roughly a factor of two per year".
We'll substitute in 18 months instead of a year. Now, it's not that things will
double in speed every 2 years. It's not that frequency will double every 18
months. It's that the cost per integrated component will be cut in half every
18 months.
Let's do some extrapolation. The Intel 8008 chip was released in April 1972 with
3,500 transistors for $120 ($906 for inflation to 2024). There have been
622 months since then, which gives us 34.6 doublings. We would therefore
expect a chip to have 3500 * 2^34.6 transistors, or about 90 trillion.
Absolutely nothing exists in that size. The largest currently released
processor is the AMD Instinct MI300A with 0.146 trillion transistors.
Let's be more generous and go with doubling every 2 years. That means there
should be 26 doublings, for 0.234 trillion transistors. The MI300A was
released in Dec 2023, so Moore's Law is in the right range if we give it a
2 year doubling period, right?
Wait, can you buy an MI300A for $906 (the inflation adjusted price of the
Intel 8008)? No, not even close. It's in the "if you have to ask, you can't
afford it" range. Reports put it around $10k to $15k each.
So Moore's Law is dead because you can't buy a 200B transistor device for
around $1000. Not even close.
All that said, Moore's original paper is quite remarkable. He made an
extrapolation that held on for a decade more, and then held on for a few
more decades after a little revision. He's also looking ahead to how this
would affect everything from radar to putting computers in the home and cars.
It was a remarkable prognostication.
2024-03-19
After dabbling with Gemini, I don't think I'll bother anymore. You can
ultimately accomplish its goals with plain HTTP if you avoid cookies or pixel
trackers or JavaScript. Which this blog now does.
It also forced links to the end of the document and other formatting
conventions.
I took the export of the old WordPress blog and parsed it into Markdown,
and used that as the basis for statically generating everything. A bunch of
embedded YouTube iframes were converted to links. Those were the only
source of JavaScript or cookies left on the site, and they're all gone now.
Could do something fancy later like taking the thumbnails, but this is fine for
now.
I'm interested in how far static site generators could go. When we have
servers with a terrabyte of RAM and flash storage in tens or even hundreds
of terrabytes, why not use that space to dramatically speed up response time
to the client? Can you have a static site CMS that's on par with WordPress?
2022-06-06
Let's start with a moderately simple regex:
/\A(?:\d{5})(?:-(?:\d{4}))?\z/
Some of you might be smacking your forehead at the thought of this being "simple", but bear with me. Let's break down what it does piece by piece. Match five digits, then optionally, a dash followed by four digits. All in non-capturing groups, and anchor to the beginning and end of the line. That tells you what it does, but not what it's for.
Explaining out the details in plain English, as in the above paragraph, doesn't help anyone understand what it's for. What you can do to help is have good variable naming and commenting, such as:
# Matches US zip codes with optional extensions
my $us_zip_code_re = qr/\A(?:\d{5})(?:-(?:\d{4}))?\z/;
Like any other code, we hand off contextual clues about its purpose using variable naming and comments. In Perl, qr// gives you a precompiled regex that you can carry around and match like:
if( $incoming_data =~ $us_zip_code_re ) { ... }
Which some languages handle by having a Regex object that you can put in a variable.
There are various proposals for improved syntax, but a different syntax wouldn't help with this more essential complexity. It could help with readability overall. Except that Perl implemented a feature for that a long time ago that doesn't so drastically change the approach: the /x modifier. It lets you put in whitespace and comments, which means you can indent things:
my $us_zip_code_re = qr/\A
    (?:
        \d{5} # First five digits required
    )
    (?:
        # Dash and next four digits are optional
        -
        (?:
            \d{4}
        )
    )?
\z/x;
Which admittedly still isn't perfect, but gives you hope of being maintainable. Your eyes don't immediately get lost in the punctuation.
I've used arrays and join() to implement a similar style in other languages, but it isn't quite the same:
let us_zip_code_re = [
    "\A",
    "(?:",
        "\d{5}", // First five digits required
    ")",
    "(?:",
        // Dash and next four digits are optional
        "-",
        "(?:",
            "\d{4}",
        ")",
    ")?",
].join( '' );
Which helps, but autoidenting text editors try to be smart with it and fail. Perl having the // syntax for regexes also means editors can handle syntax highlighting inside the regex, which doesn't work when it's just a bunch of strings.
More languages should implement the /x modifier.
2022-05-05
I haven't updated the blog in a while, and I'm also rethinking the use of WordPress. So I decided to dump the old posts, and convert it to gemtext, the Gemini version of markdown.
https://gemini.circumlunar.space/
The blog will be hosted on Gemini, as well as static HTTP.
Not all the old posts converted cleanly. A lot of the code examples don't come through with gemtext's preformatted blocks. Some embedded YouTube vids need their iframes converted to links. Comments are all tossed, which is no big loss since 95% of them were spam, anyway.
2021-02-08
https://www.youtube.com/watch?v=DcEMNovvb1s
2021-01-01
People often misunderstand the speed ratings of SD cards. They are built cheaply, and historically have primarily targeted digital cameras. That meant they emphasized sequential IO performance, because that's how pictures and video are handled. When we plug an SD card into a Raspberry Pi, however, most of our applications will use random reads and writes, which is often abysmal on these cards.
Enter the A1 and A2 speed ratings. These were created by the SD Card Association to guarantee a minimum random IO performance, which is exactly what we want for single board computers.
There's been a blog post floating around about how the A2 class is marketing BS. In some cases, I've seen this cited as evidence of the A1 class also being marketing BS. After all, the top cards on the chart for random IO, the Samsung Evo+ and Pro+, don't have any A class marks on them.
This misunderstands what these marks are for and how companies make their cards. Your card has to meet a minimum speed to have a given mark. You are free to exceed it. It just so happens that Samsung makes some really good cards and have yet to apply for the mark on them.
Samsung could change the underlying parts to one that still meets its certification marks for the model, but with far worse random IO performance. I don't think Samsung would do that, but they would technically be within their rights to do so. This kind of thing has happened in the storage industry before. Just this past year, Western Digital put Shingled Magnetic Recording on NAS drives (SMR is a hard drive tech that craters random write performance, making them completely unsuitable for NAS usage). XPG swapped out the controller on the SX8200 Pro to a cheaper, slower one invaliding the praiseworthy reviews they got at launch.
Even if Samsung wouldn't do that, it's still something where you have to go out of your way to find the best SD card. Well-informed consumers will do that, but the Raspberry Pi serves a broad market. Remember, its original purpose was education. You can't expect people to even know what to research when they're just starting out. It also doesn't help that major review sites don't touch on SD cards. Benchmarking can be a tricky thing to do right, and most hobbyist bloggers don't have the resources to do a good, controlled test, even if they mean well.
What the A class marks do is give a clear indication of meeting a certain minimum standard, at least in theory. Independent reviews are always good in order to keep everyone honest, but if you don't have time to look at them, you can grab an A1 card and put it in your Pi and you'll be fine.
As the blog post noted above states, A2 cards don't always live up to their specs. According to a followup post, this appears to be due to things the OS kernel needs to support, rather than the card itself. It's also possible for a company to try to pull a fast one, where they launch with a card that meets spec, and then quietly change it. However, if they do, they don't just have consumer backlash to contend with, but the SD Card Association lawyers. Since they hold the trademark on the A class marks, they have the right to sue someone who is misusing it.
Marketing isn't just about making people into mindless consumers. It can also be about conveying correct information about your product. That's what the A classes are intended to do. Nobody knew that Samsung Evo and Pro cards were good until somebody tested them independently. With the A class marks, we have at least some kind of promise backed up with legal implications for breaking it.
2020-10-28
I slapped GStreamer1 together some years ago using the introspection bindings in Glib. Basically, you point Glib to the right file for the bindings, and it does most of the linking to the C library for you. They worked well enough for my project, so I put them up on CPAN. They cover gstreamer 1.0, as opposed to the GStreamer module, which covers 0.10 (which is a deprecated version).
It has an official Debian repository now, but I was informed recently that it would be removed if development continued to be inactive. Besides having enough time, I also don't feel totally qualified to keep it under my name. I don't know Gtk all that well, and don't have any other reason to do so anytime soon. I was just the guy who made some minimal effort and threw it up on CPAN.
I've found GStreamer to be a handy way to access the camera data in Perl on the Raspberry Pi. It's a bit of a dependency nightmare, and keeping it in the Debian apt-get repository makes installation a lot easier and faster.
So it's time to pass it on. As I mentioned, they're mostly introspection bindings at this point. It would be good to add a few custom bindings for things the introspection bindings don't cover (enums, I think), which would round out the whole feature set.
Next →
Copyright © 2025 Timm Murray
CC BY-NC
Email: tmurray@wumpus-cave.net

Opinions expressed are solely my own and do not express the views or opinions
of my employer.
